
Connecticut Elevated-Deck Planning Guide
Under-Deck Drainage in Connecticut: Plan a Dry Space Below an Elevated Deck
A second-story deck can create two outdoor spaces instead of one—but only when the structure, water path, house connection, discharge, ceiling, and future maintenance are designed together.
Under-deck drainage in Connecticut should be planned as part of the elevated deck, not as a cosmetic ceiling installed after the water problems begin. The useful question is not simply, “Can we keep the patio dry?” It is, “Where will every gallon go, and what remains inspectable after the project is complete?”
Open deck boards are designed to shed water through their gaps. On an elevated deck, that water lands on the joists, beams, patio, doors, windows, walkways, landscaping, or lower-level entry below. A drainage system changes that path by collecting water either above the joists or beneath them and carrying it to a gutter and downspout.
That can make the area below more comfortable for seating, storage, lighting, or a protected route between the house and yard. It can also create trouble if the system holds debris, pitches toward the house, hides deteriorated framing, overwhelms a small gutter, empties next to the foundation, or gets treated like a roof over finished interior space when it was never designed for that use.
This guide gives Connecticut homeowners a practical way to compare systems, decide whether to install one during a new build or retrofit an existing deck, and turn the full scope into a clear contractor proposal.
Start With the Space Below
Define what “dry” needs to mean at your home.
A homeowner who wants a place for two lounge chairs has a different finish and risk profile from someone planning a ceiling, fan, television, electrical outlets, cabinets, or enclosed storage. Begin with the intended use, then decide how much weather protection, drainage capacity, headroom, light, ventilation, access, and finish quality that use requires.
Protected patio
The goal is a comfortable seating or dining area during ordinary rain. The plan should address drips at edges, wind-driven rain, splash, gutter overflow, surface drainage, and the route between the house and yard.
Weather-protected storage
Outdoor furniture, tools, and seasonal items still need a raised, drained surface and realistic protection from humidity, blowing rain, snow, pests, and condensation. A deck drainage system is not automatically conditioned storage.
Finished outdoor room
A ceiling, lights, fan, speakers, screens, or a television add trades, service access, moisture-rated equipment, clearances, permits, and replacement questions. Those items should appear on the drawings and in the written scope.
Look at the lower level during rain before finalizing the design. Note which direction the yard slopes, where roof and deck runoff already travels, whether water reaches a basement door or foundation, where snow piles, how leaves move, and whether a lower patio is pitched to drain. The new system should improve that pattern instead of concentrating water at a more damaging location.
Compare the Water-Control Layer
Above-joist and below-joist systems solve different problems.
Names vary by manufacturer, but most under-deck drainage plans fall into two broad families. An above-joist system is installed over the joists and beneath the deck boards. It intercepts water before it reaches most of the framing. A below-joist system hangs beneath the framing and catches water after it has passed through the deck and across the joists.
| Planning factor | Above-joist system | Below-joist system |
|---|---|---|
| Best timing | Usually most practical during a new deck, full rebuild, or resurfacing project when the boards are already removed. | May be considered beneath some existing decks without removing all surface boards, depending on access, structure, layout, and product. |
| Framing exposure | Designed to intercept water before it routinely wets the joist tops and much of the framing below. | The framing remains above the collection layer and is still exposed to water passing through the board gaps. |
| Headroom | Uses space within the framing depth, with a separate ceiling below if desired. | Channels, panels, gutter, and finish may reduce clear height beneath the joists. |
| Inspection | Deck boards may need to be removed to access portions of the drainage layer; the finish below should still allow strategic access. | The system may hide joists and connections from below, so removable panels or access points become important. |
| House connection | The troughs, wall flashing, ledger area, first deck board, and siding transition must be coordinated before the surface closes. | The upper deck-to-house connection still needs its own correct flashing; a ceiling below cannot repair a leaking ledger. |
| Retrofit question | Board removal can reveal whether the existing framing is suitable and creates an opportunity to correct the ledger and joist condition. | Installation may be less disruptive to the surface, but the existing framing and hidden moisture conditions still need evaluation first. |
Neither category is automatically right for every deck. The decision depends on whether the deck is new or existing, the condition and spacing of the framing, the board layout and fasteners, the house connection, beams and blocking, stairs, posts, cantilevers, planned ceiling, available headroom, runoff destination, product instructions, and local approval requirements.
Be cautious with a proposal that uses the words “waterproof deck” without defining the assembly and its limits. Open sides still admit weather, drains can clog, wind can push rain around edges, and any system can be compromised by poor seams, penetrations, slope, or maintenance. A clear proposal should identify the manufacturer, exact components, installation method, exclusions, warranty, and expected conditions below.
Real Ellis Elevated-Deck Proof
The drainage plan starts with a sound deck that fits the home and terrain.
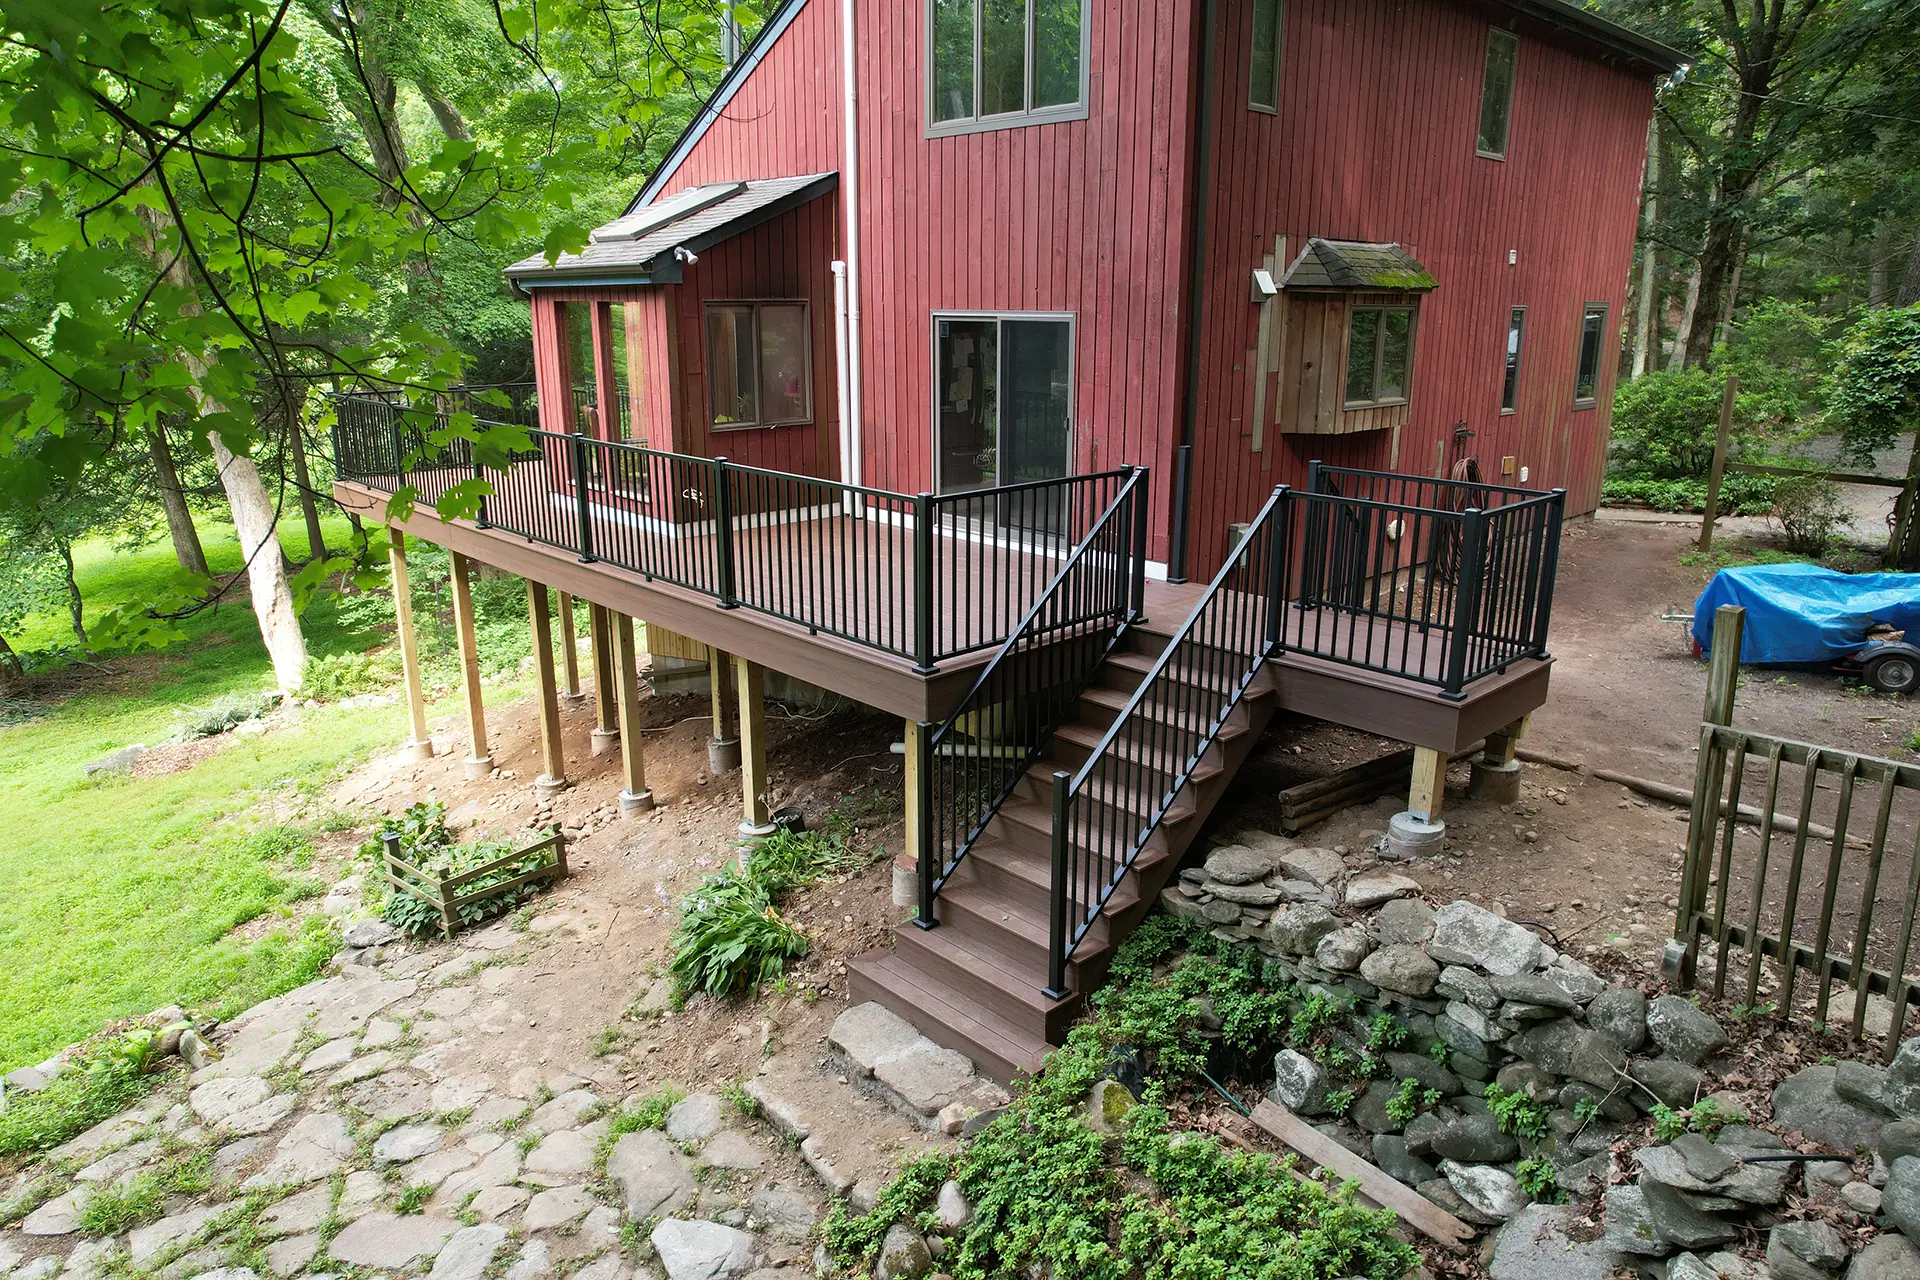
This elevated Connecticut deck from the Ellis Builders project library shows why the entire structure matters. The house connection, long outer edge, stairs, posts, changing grade, doors, windows, and usable ground below all affect whether a dry-space plan is practical.
An under-deck system should not be used to conceal a ledger problem, soft framing, undersized connection, loose guard, failing stair, or unstable post. If the deck is being resurfaced, the inspection should happen before durable new boards and a ceiling make the framing harder to reach.
For a deeper look at the most important house connection, read the Connecticut deck ledger flashing guide. Homeowners comparing full deck options can also review Trex versus pressure-treated decking.
Follow Every Gallon
A drainage system is only as complete as its discharge route.
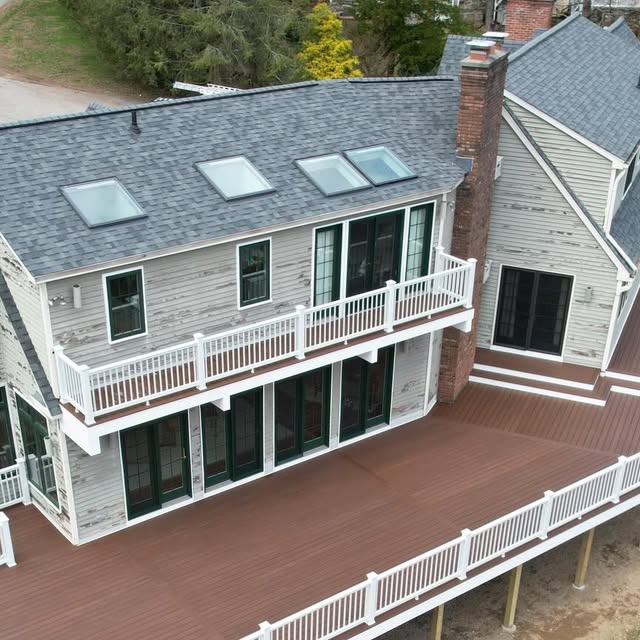
The collection layer gets most of the attention, but the gutter and discharge often decide whether the project performs well. The full route begins where water crosses the deck surface and ends where the downspout releases it. Every transition needs positive drainage, compatible materials, a service plan, and enough capacity for the area being collected.
| Part of the route | Question the drawings should answer |
|---|---|
| Deck-board gaps | Do the board spacing, fasteners, picture-frame details, stairs, and rail posts work with the selected drainage system and decking instructions? |
| Troughs or panels | How is consistent slope created, how are seams and penetrations sealed, and how are unusual bays, blocking, beams, or cantilevers handled? |
| House wall and ledger | How does the drainage layer meet the wall flashing without sending water behind the ledger, siding, door, or trim? |
| Collection gutter | Where is the gutter placed, what size is it, how is it supported, and can it be cleaned without dismantling the ceiling? |
| Downspout | How many outlets are included, where do they travel, and can the route freeze, clog, or conflict with posts, stairs, doors, or walkways? |
| Final discharge | Does water reach an approved location without creating foundation moisture, erosion, icing, a neighbor impact, or a saturated planting bed? |
A large elevated deck collects a large area of rainfall. Moving that water to one corner can turn a previously diffuse drip pattern into a concentrated flow. The designer should consider the contributing area, roof runoff that may also land on the deck, leaf load, local site conditions, the number of outlets, and the capacity and maintenance access of the gutter and downspout.
If a roof downspout already empties onto the deck, include it in the review. The best answer may be to reroute the roof water separately rather than asking the under-deck system to accept an additional concentrated stream. The same is true for hose water, snowmelt, planters, outdoor kitchens, and any future feature that changes how water reaches the deck.
Manufacturer System Example
Install the drainage layer while its slope, seams, wall tie-in, and outlets are visible.
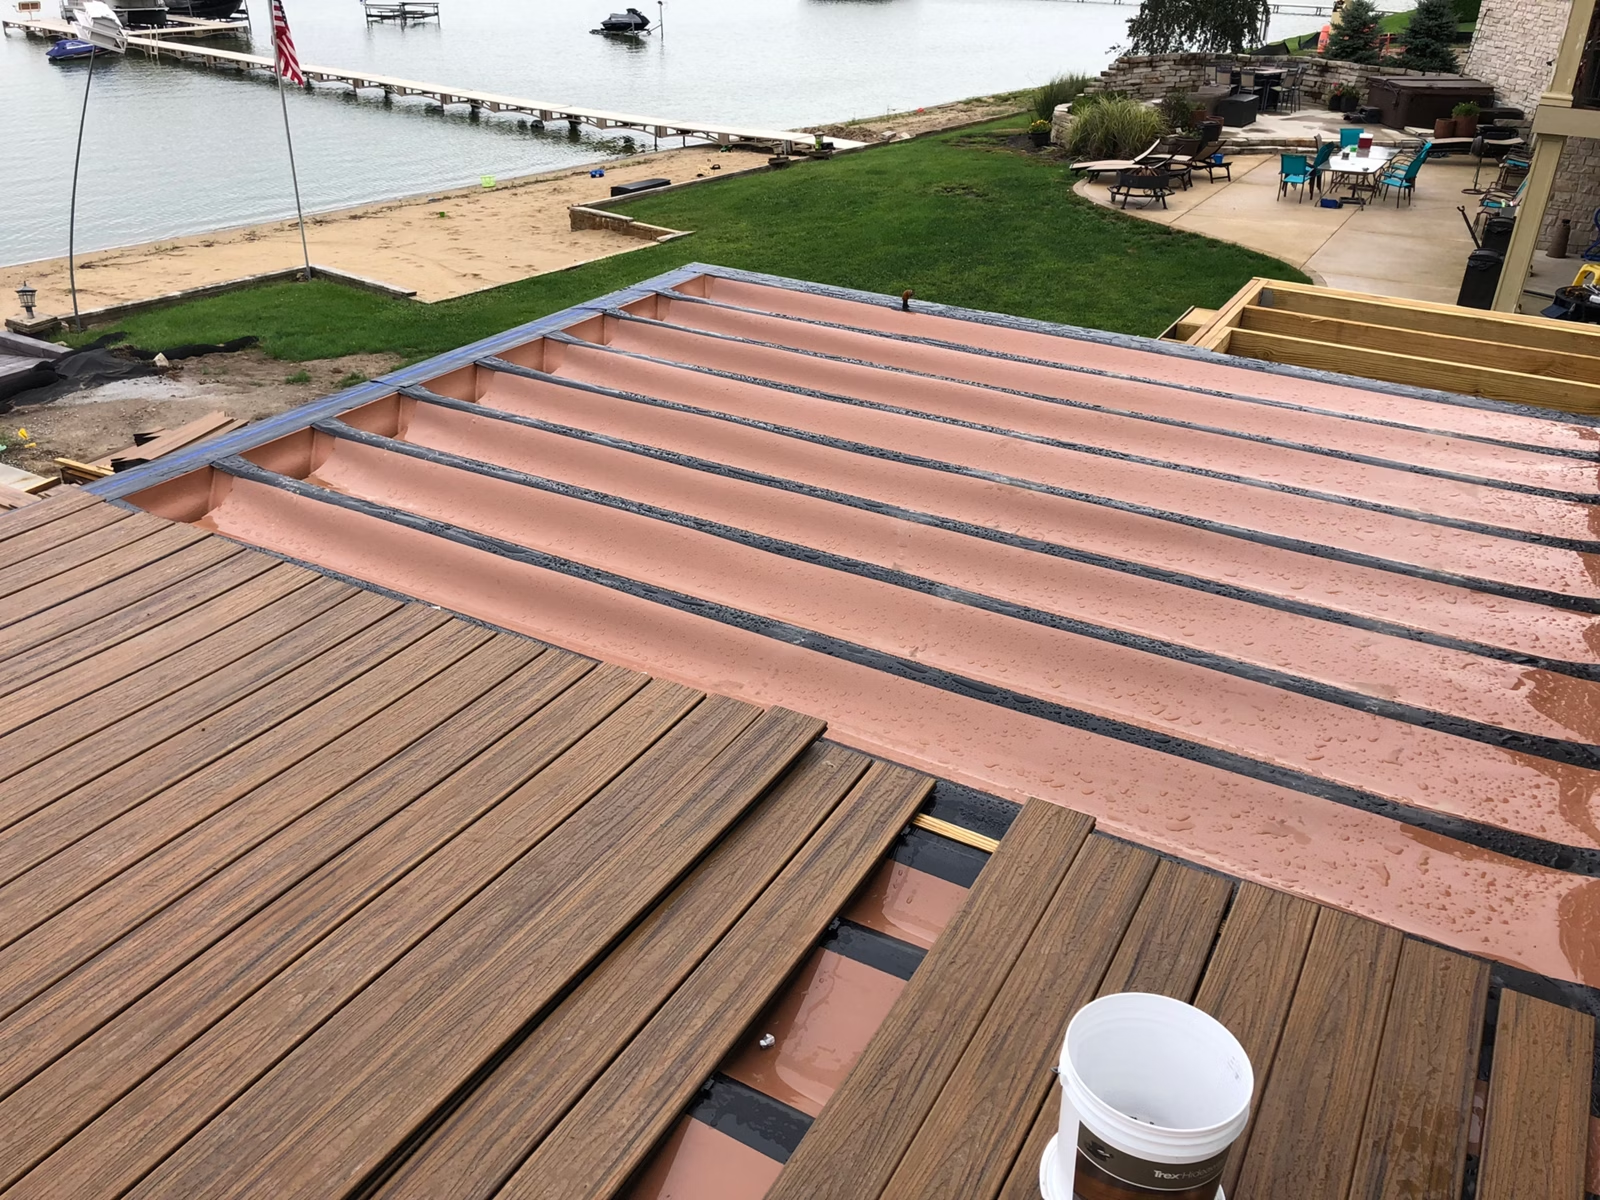
Trex describes RainEscape as an above-joist trough-and-downspout system that collects water passing between deck boards and directs it to a gutter. The manufacturer also explains that this arrangement can protect the framing below and create space for utilities and a finished ceiling.
The useful lesson is broader than one brand: concealed water-control work should be checked before the boards and ceiling cover it. The crew should be able to demonstrate continuous pitch, sealed seams, clean outlets, correct wall flashing, protected post and beam transitions, and a successful water test across every joist bay.
Review Trex’s official RainEscape installation overview and dry-space system information to understand the components and intended use. The selected product instructions, approved plans, and actual deck conditions control the installation at your home.
Existing Deck or New Build
Retrofit decisions should begin with the structure—not the ceiling catalog.
An existing deck may be a candidate for drainage, but age alone does not answer the question. The contractor should inspect accessible ledgers, joists, beams, posts, footings, connections, stairs, guards, decking, fasteners, and the lower-level wall. Evidence of recurring moisture, insect activity, movement, improvised repairs, or undersized components can change the project from an accessory installation to a repair or rebuild.
Ask what must be removed to inspect the deck and who decides whether concealed framing can remain. A proposal should state the assumptions used for pricing, unit prices or an approval process for hidden repairs, and what happens if the deck cannot support the planned retrofit without reconstruction.
Also ask how the new layer affects future board replacement. Some surface fasteners penetrate the drainage layer by design and rely on the complete manufacturer system to seal around them. A later repair performed without the original records may damage the system. Keep the product name, layout photos, fastener type, joist spacing, seam locations, outlets, and installer information with the house records.
Finish the Lower Space Carefully
The ceiling, lighting, and furniture should respect water, wiring, ventilation, and access.
Once the drainage layer works, the area below can be finished to suit the planned use. A ceiling creates a cleaner appearance and can conceal troughs, gutter connections, wiring, and framing. That same ceiling can also hide a leak or make a clogged outlet difficult to reach. Plan removable sections or access points at the house connection, outlets, gutter, downspout transitions, wiring connections, and any location that may require service.
Ceiling and trim
Specify the material, support, slope or level appearance, edge trim, expansion details, ventilation, color, cleaning method, and how panels can be removed without permanent damage.
Lighting and power
Use qualified electrical professionals, appropriate permits, and equipment selected for the actual damp or wet exposure. Show fixture, fan, switch, outlet, cable, and access locations before the ceiling is framed.
Patio and furnishings
Confirm that the lower surface drains, furniture does not block outlets or access, grills and heaters follow manufacturer clearances, and wind-driven rain can leave without being trapped against the house.
A dry-space system does not automatically turn the area below into conditioned interior square footage. Enclosing the sides, adding walls, glazing, heat, plumbing, or a weather-sensitive finish can introduce new building, moisture, egress, structural, electrical, and zoning questions. Define that expansion before the deck and drainage drawings are approved.
If the project includes a fan, television, refrigerator, speakers, or an outdoor kitchen, make each item part of the written coordination plan. “Electric by owner” is not enough if the deck framing, drainage layer, and ceiling leave no approved route for wiring or no access for future service.
Connecticut Planning and Seasonal Use
Design for rain, leaves, snowmelt, freeze-thaw cycles, and local review.
Connecticut decks experience spring pollen, summer storms, autumn leaves, wind-driven rain, snow, ice, and repeated freezing and thawing. A system that drains cleanly when new still needs a way to shed small debris, a reachable gutter, and a maintenance routine before winter.
Do not use salt, heat equipment, pressure washing, chemicals, or sharp tools on the deck or drainage system unless the relevant product manufacturer permits it. Snow removal above should also follow the decking and railing instructions. Below, inspect for frozen discharge, displaced panels, staining, or icicles that reveal overflow or a blocked route.
The current Connecticut State Building Code resources provide the statewide code framework, while the local building department administers permits, plans, and inspections. The City of Waterbury’s official homeowner guide for decks and additions is a useful example of the plans and information a Connecticut municipality may request. Your own town and approved documents control the project at your address.
Homeowner Quote Checklist
Make the hidden water path visible in the written scope.
- What is the planned use of the space below, and what level of weather protection is promised?
- Is the deck new, rebuilt, resurfaced, or left intact?
- What structural inspection is included before the drainage system is approved?
- Is the system above the joists or below them, and why does that fit this deck?
- What manufacturer, product line, components, tape, sealant, and fasteners are specified?
- How are slope, joist bays, blocking, beams, posts, stairs, rail posts, and unusual angles handled?
- How does the system integrate with the ledger flashing, siding, doors, windows, and trim?
- Where are the collection gutter, outlets, and downspouts located?
- Where does the final discharge go, and how are foundation moisture, erosion, and icing avoided?
- How are the troughs, seams, outlets, and full system water-tested before covering?
- Which ceiling, trim, ventilation, and removable access panels are included?
- Who coordinates lights, fans, outlets, wiring routes, permits, and moisture-rated equipment?
- How will concealed damage be documented, approved, and priced?
- Which local permits, drawings, and inspections are included?
- What exclusions apply to wind-driven rain, snow, storage, enclosure, or conditioned-space use?
- Which manufacturer and workmanship warranties apply, and what maintenance keeps them valid?
- Will the homeowner receive pre-cover photographs, product records, care instructions, and final inspection documents?
After Installation
Test the system, preserve access, and keep a simple seasonal routine.
Before the ceiling closes, ask the contractor to run water through every bay and photograph the wall transition, seams, post details, outlets, gutter pitch, downspout route, and discharge. Inspect the lower area during the test rather than relying only on a bucket at the end of the downspout.
After completion, check the system during ordinary rain and again during a heavier storm. Look for drips at seams, staining at the house, overflow at the gutter, water near electrical equipment, erosion at discharge, or water traveling toward the foundation. Correct those patterns while the contract, weather event, and installation details are current.
At least seasonally—and more often under heavy tree cover—remove accessible leaves and debris according to the manufacturer instructions. Confirm that outlets and gutters are open, the downspout is connected, discharge remains stable, ceiling panels have not moved, and no pests have nested in service areas. Keep plants, furniture, and stored items away from inspection openings and the discharge path.
Save the contract, approved plans, permits, inspection records, product names, layout photographs, water-test documentation, hidden-repair approvals, electrical records, warranties, and care instructions. These records make future decking, ceiling, lighting, gutter, and drainage service much safer and more predictable.
FAQ
Under-deck drainage questions from Connecticut homeowners.
Can an under-deck system make the patio completely waterproof?
A well-designed system can keep the area below much drier by collecting water that passes through the deck, but open sides, wind-driven rain, overflow, snow, splash, penetrations, and maintenance still matter. The contract should define the expected performance and exclusions.
Is an above-joist or below-joist system better?
Neither is automatically best. Above-joist systems are often planned during a new build, rebuild, or resurfacing and can intercept water before it regularly reaches the framing. Below-joist systems may be easier to consider beneath some existing decks, but the framing remains above the collection layer.
Can under-deck drainage be added to an existing deck?
Sometimes. The deck’s structure, house connection, framing layout, decking, access, condition, headroom, discharge route, and selected product determine whether a retrofit is practical or whether resurfacing or rebuilding is the better path.
Does the space below become an indoor room?
No. A drainage system and ceiling do not automatically create conditioned or code-compliant interior space. Walls, glazing, heat, plumbing, electrical equipment, and enclosure can introduce additional design, permit, moisture, and zoning requirements.
Where should the collected water go?
The system should discharge to an approved location that does not create foundation moisture, erosion, icing, walkway hazards, saturated landscaping, or impacts beyond the property. The route should be shown before construction.
Will I need a permit in Connecticut?
Requirements depend on the town and scope. New or altered deck structure, stairs, guards, footings, electrical work, enclosure, and drainage changes may require plans, permits, or inspections. Confirm with the local building department before work begins.
Next Step
Plan the elevated deck and the space below as one connected project.
Ellis Builders can review the deck, accessible structure, house connection, grade, lower-level use, water path, stairs, railings, and finish goals, then help define whether the right scope is a new deck, structural correction, resurfacing, an under-deck drainage system, or a coordinated rebuild.
Connecticut Deck Builder
Ellis Builders in Southbury, CT
Ellis Builders is based at 238 Reservoir Rd in Southbury and builds, repairs, resurfaces, and replaces decks for homeowners across New Haven County, Litchfield County, Fairfield County, and surrounding Connecticut communities.
Explore Connecticut decking services, visit the Southbury deck builder page, compare options for a Waterbury deck or Ridgefield deck, or request a consultation.
Planning references used in this guide include Connecticut’s current building-code resources, a Connecticut municipal deck and addition guide, Connecticut DCP’s home-improvement contract guidance, and Trex’s official RainEscape information.

Join the discussion One Comment